The one question that I get asked more than anything else is “Who takes your photos?”, and up until January of this year I answered “Myself.” While Crystal is now taking all my photos I still edit each and every one that makes its way onto the blog. Knowing how to edit your own photos is crucial whether it be for your blog or just Instagram, and today I’m breaking down how to edit outfit photos in Lightroom. Believe it or not, it’s pretty straight forward.
Few things to keep in mind before we jump into editing. Always shoot in RAW. If you’re unsure what that is please reference your camera’s instruction manual. This allows you to have more control over the editing of your photos, BUT it also means that your photo will be more flat directly out of camera. Don’t worry – we’ll fix that.
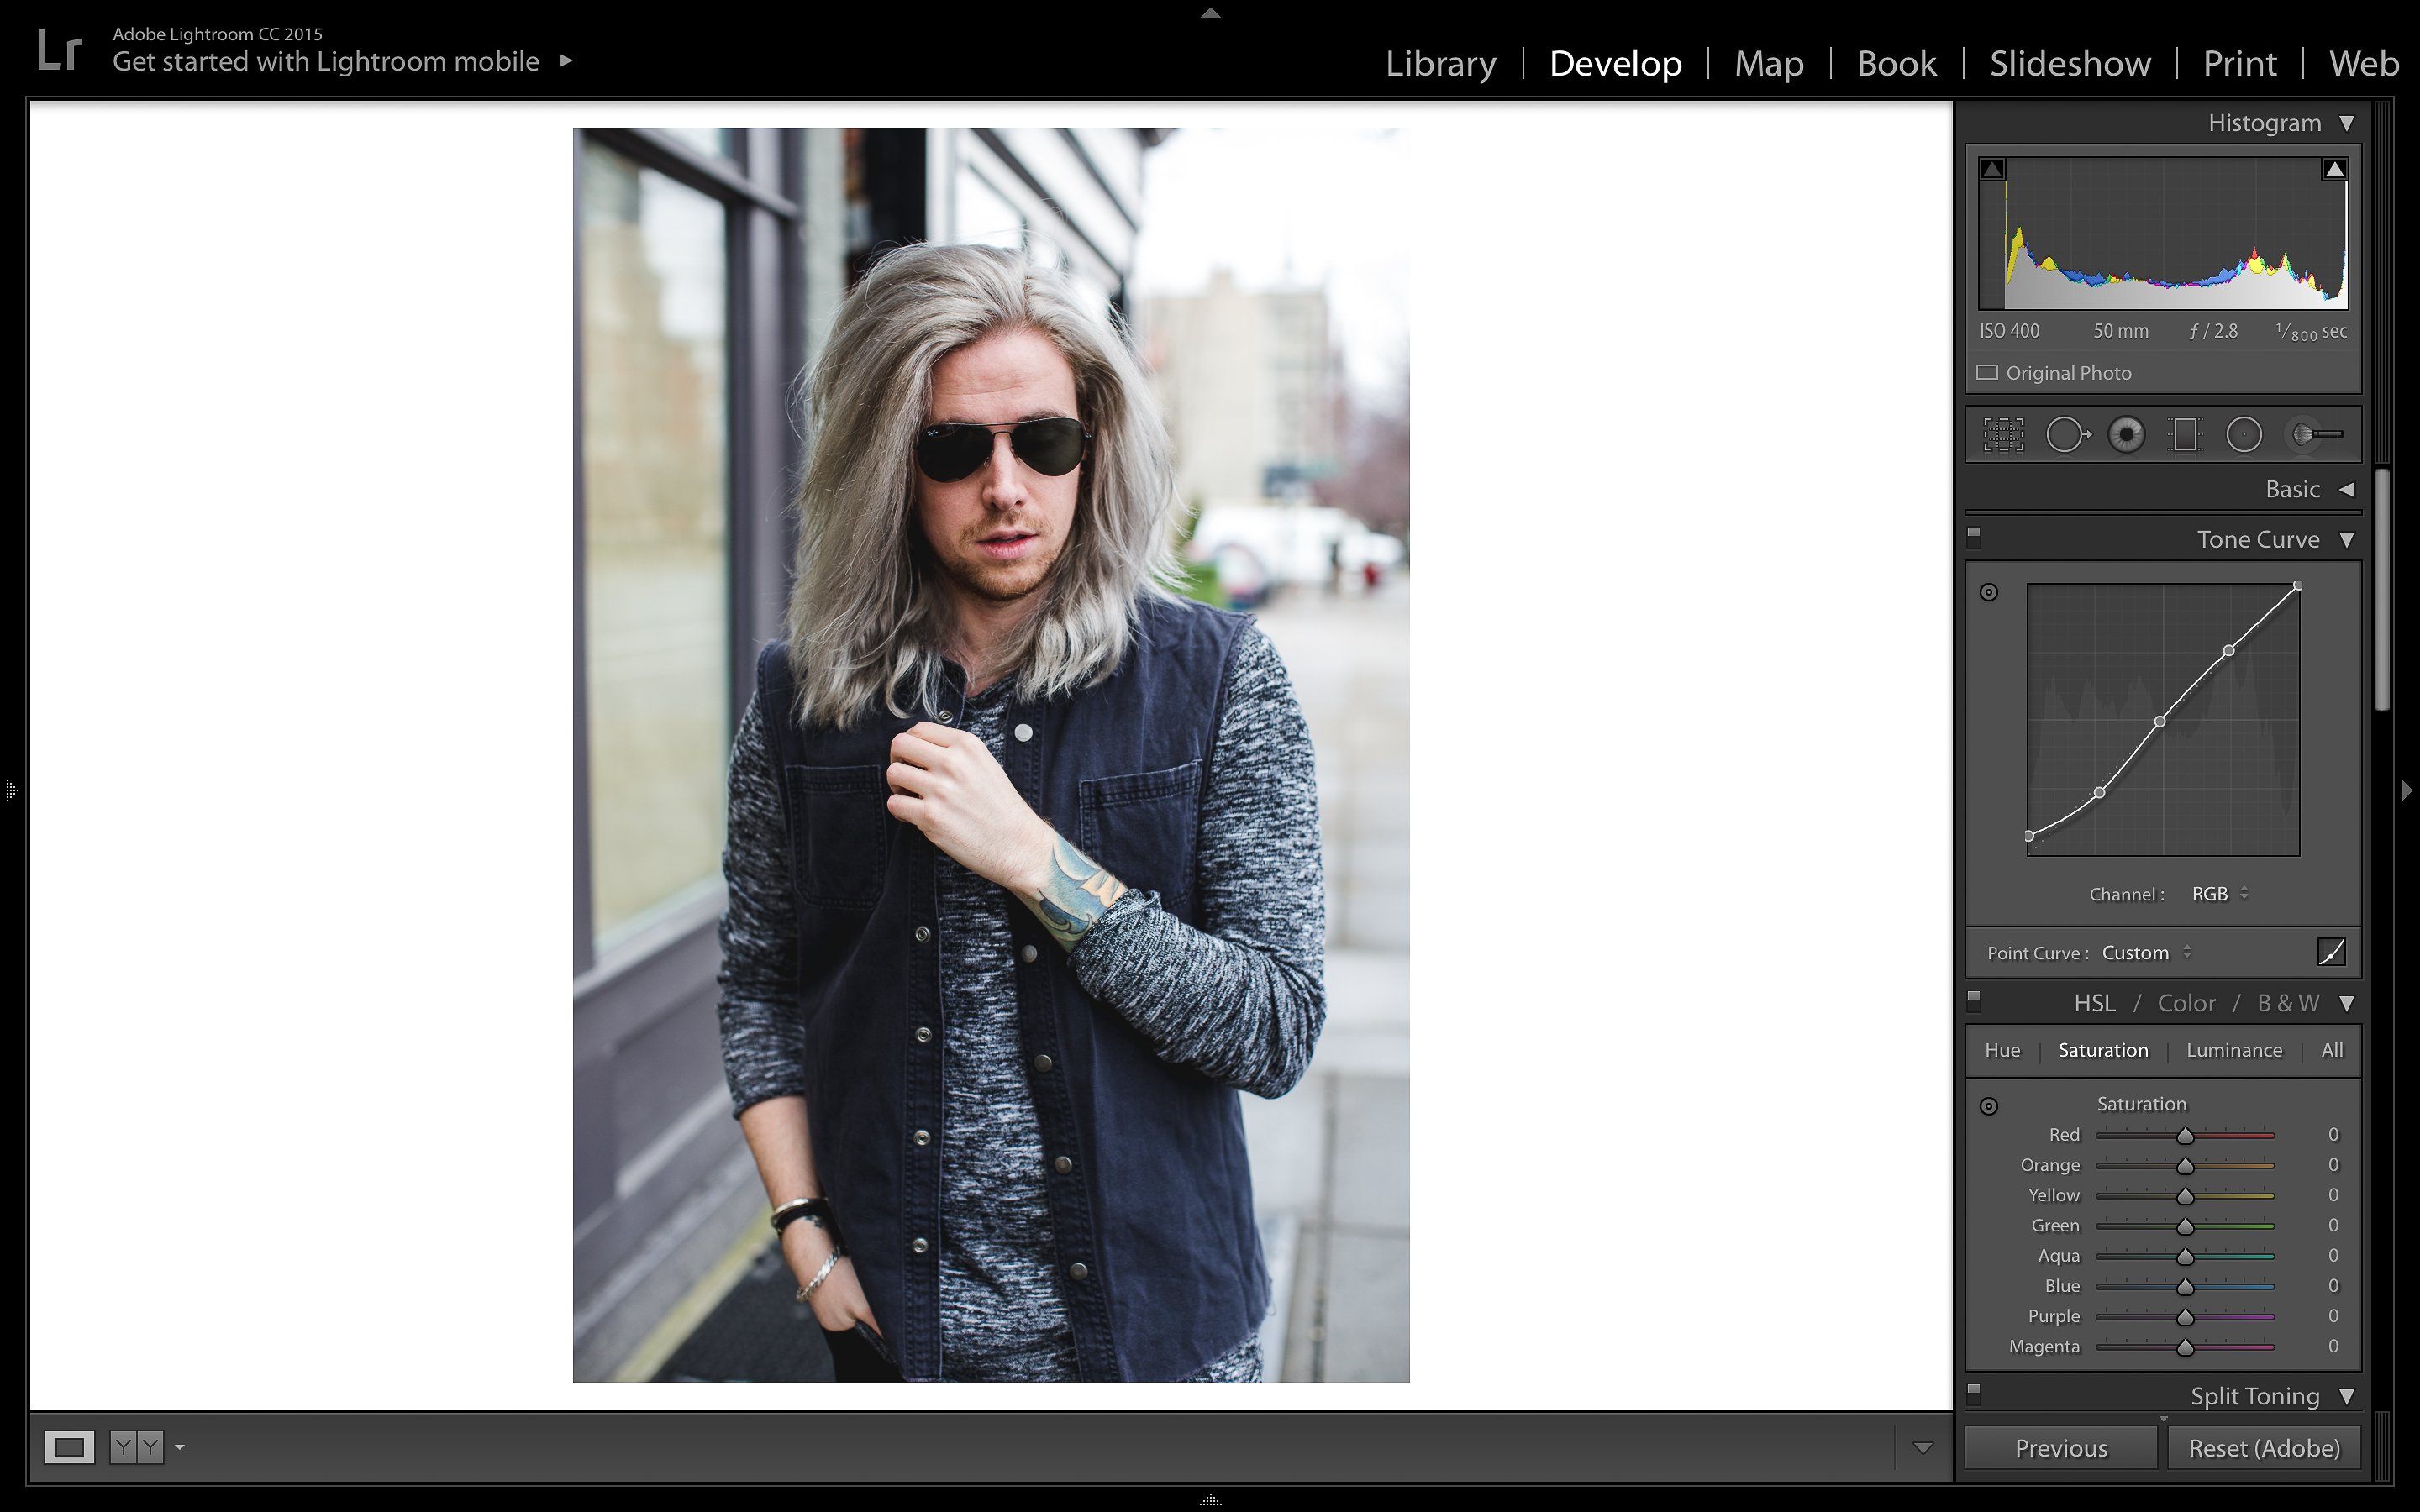
Other than that, if you’re shooting your own photos learn to shoot outside of Automatic mode – especially if you’re shooting with a DSLR. Current trend with outfit photos includes the blurred background which you can achieve by shooting at a lower aperture. The other two things that come into play her are ISO and Shutter Speed. Find the bokeh effect that you like and adjust the other two settings to create a crisp photo, lower shutter speeds and higher ISOs for darker areas and higher shutter speeds and lower ISOs when shooting during daylight. Try not to shoot above 400 ISO unless you like grainy photos and don’t shoot lower than 100-200 shutter speed if you’re holding your camera in hand.
I skipped over the steps of importing, sorting your photos, and culling your selections as those steps are all necessary to be where we are right now. If you happen to have any questions as far as that process goes mine looks something like this: import all photos, sort through and flag photos I initially like, then re-sort by flagged photos and make final selections. Then begins the editing process outlined below.
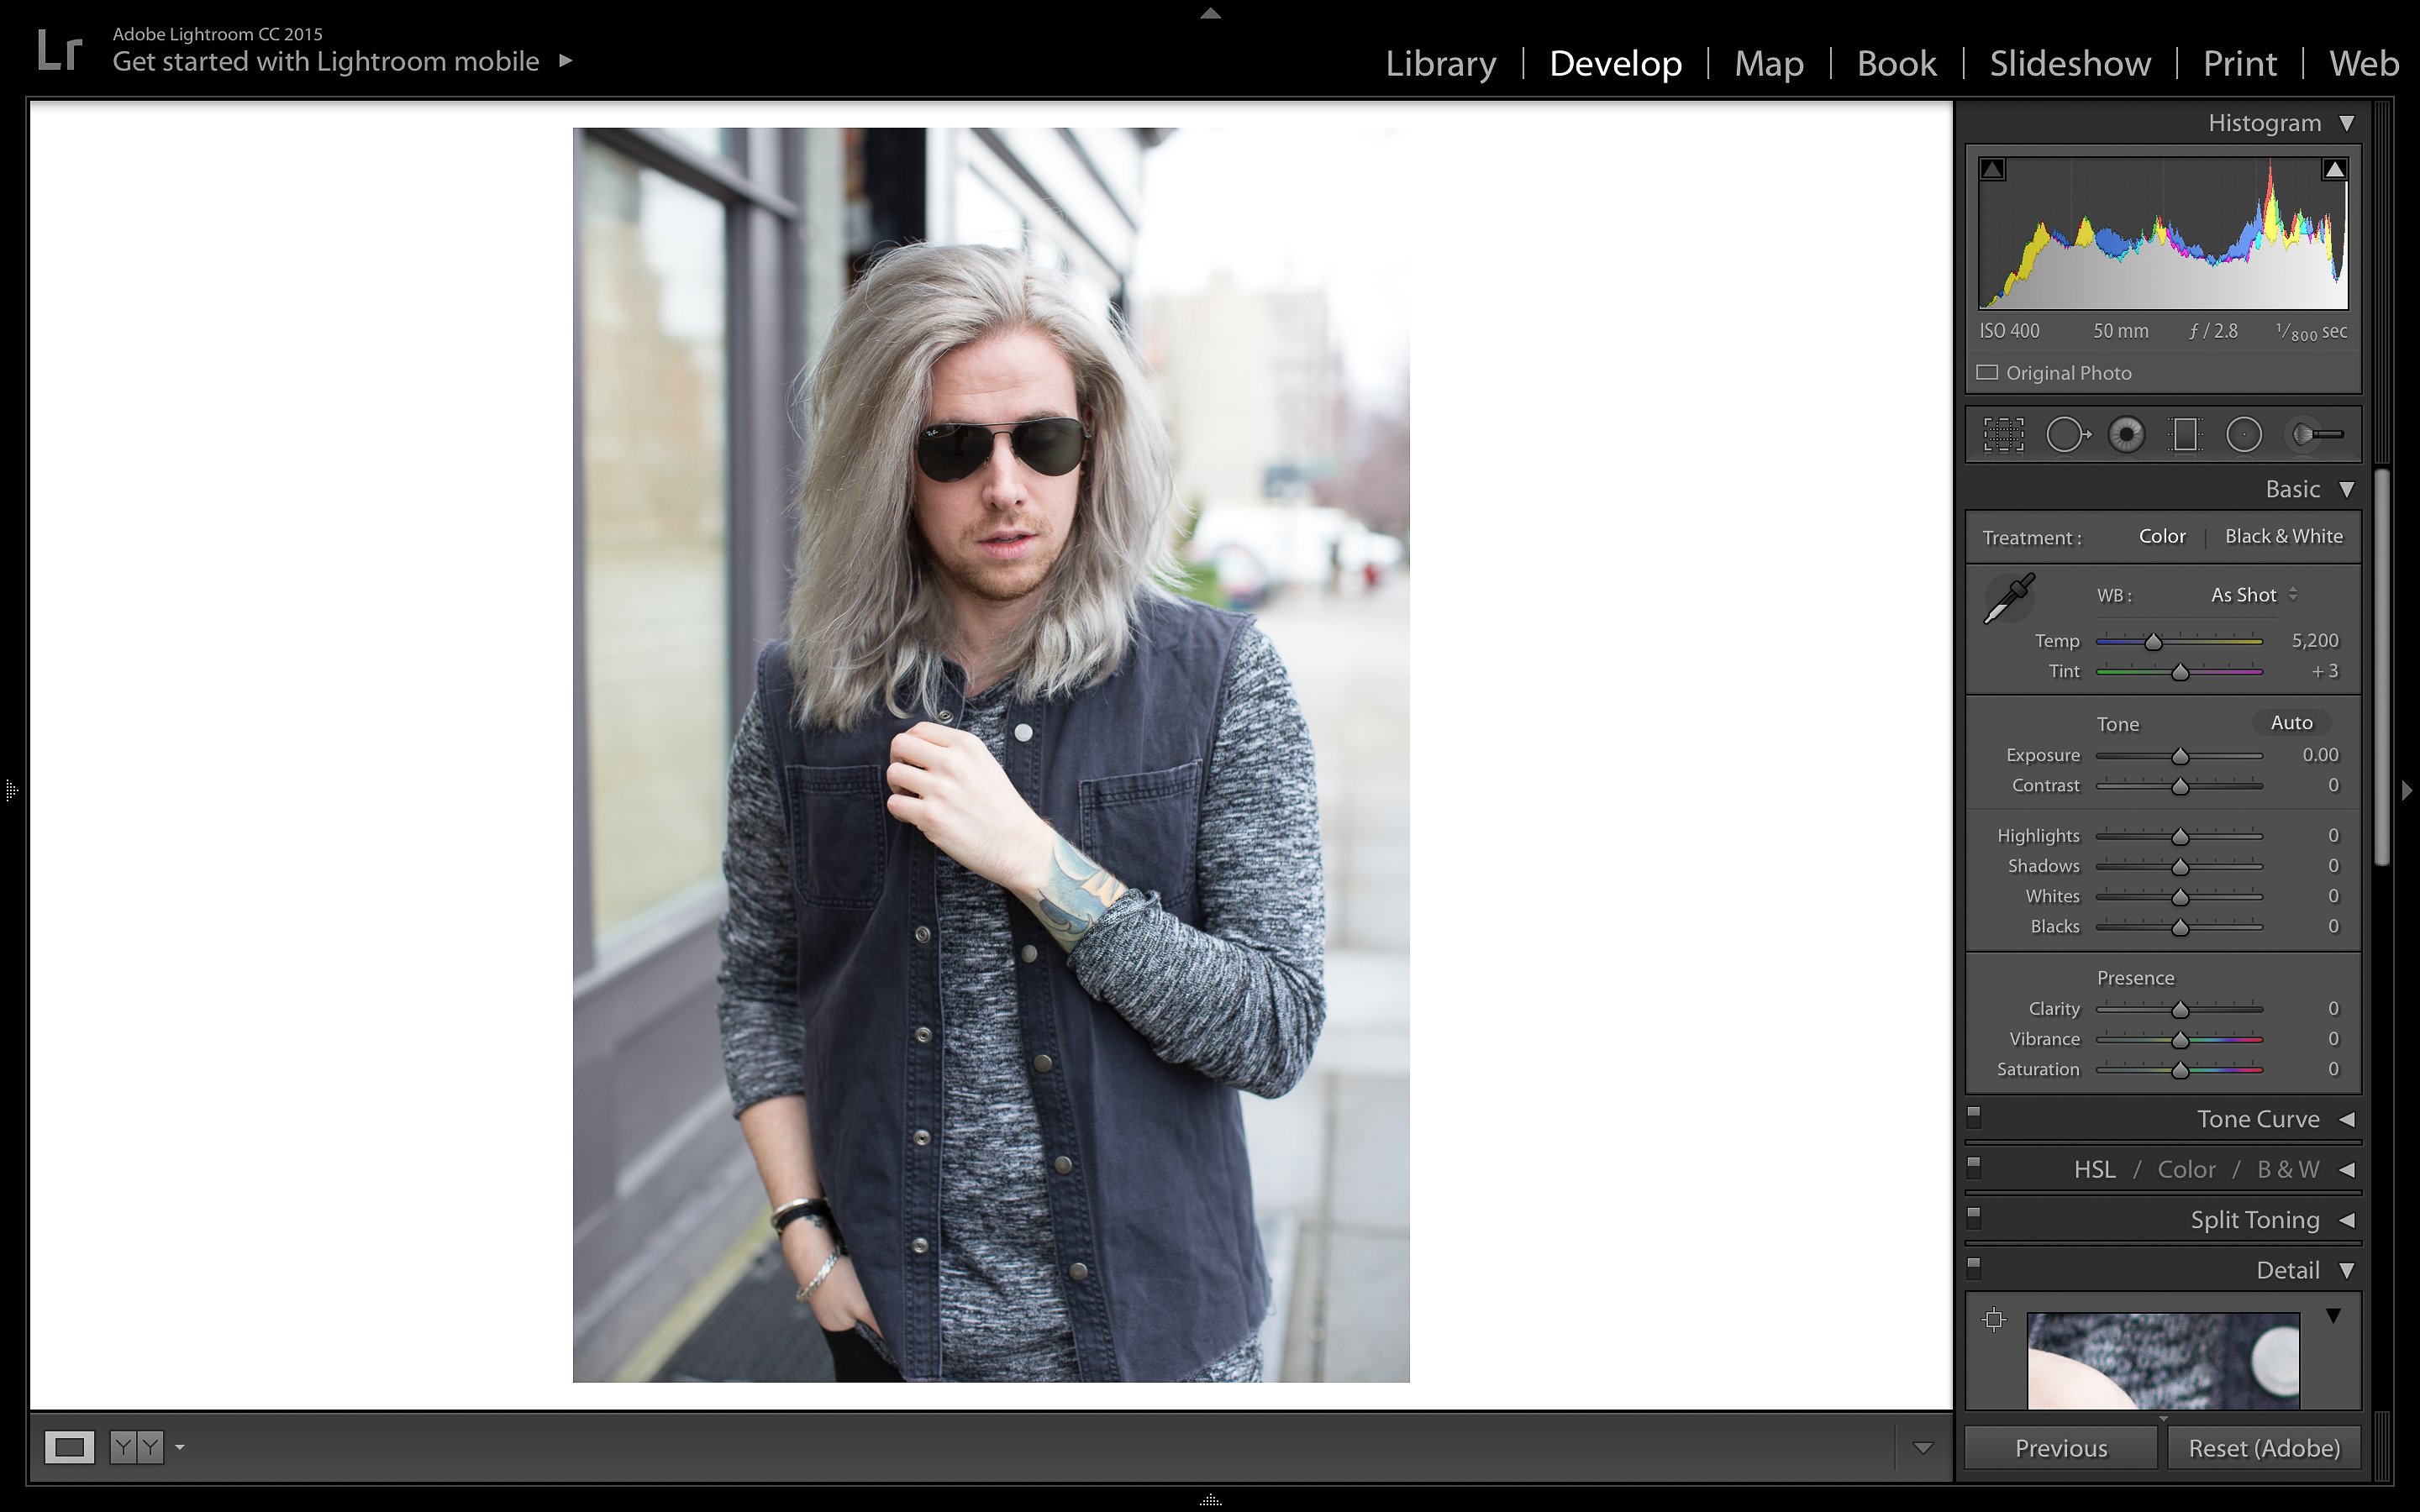
White Balance: I’ll start this off by saying we’re going to work from the top to bottom, meaning the basic panel all the way down to camera calibration. If you’re shooting outdoors under a cloudy sky (like in this photo) white balance will be pretty spot on, so I didn’t adjust for this photo. There are three ways to adjust the white balance in your photos.
- Eye Dropper Tool: Grab the dropper and find a neutral color in the image (grey, white, tan, beige, etc.), and then Lightroom will adjust temperature and tint based on your selection. Great for some situations, but in images like this – not so much.
- Presets: There are several preset white balances built into Lightroom for pretty much any shooting situation. If you’re unsure which direction to you this is the perfect starting point. Click where it says “As Shot” and the other options will show.
- Your Eyes: This is the method I use more often than not, and it’s not always the easiest. I’m lucky to have an eye for color which means I usually know which direction to you. If your photo is too yellow drag the slider towards the blue and vice versa, same thing goes for the tint of the photo. Takes some getting used to, but it’s worth it.
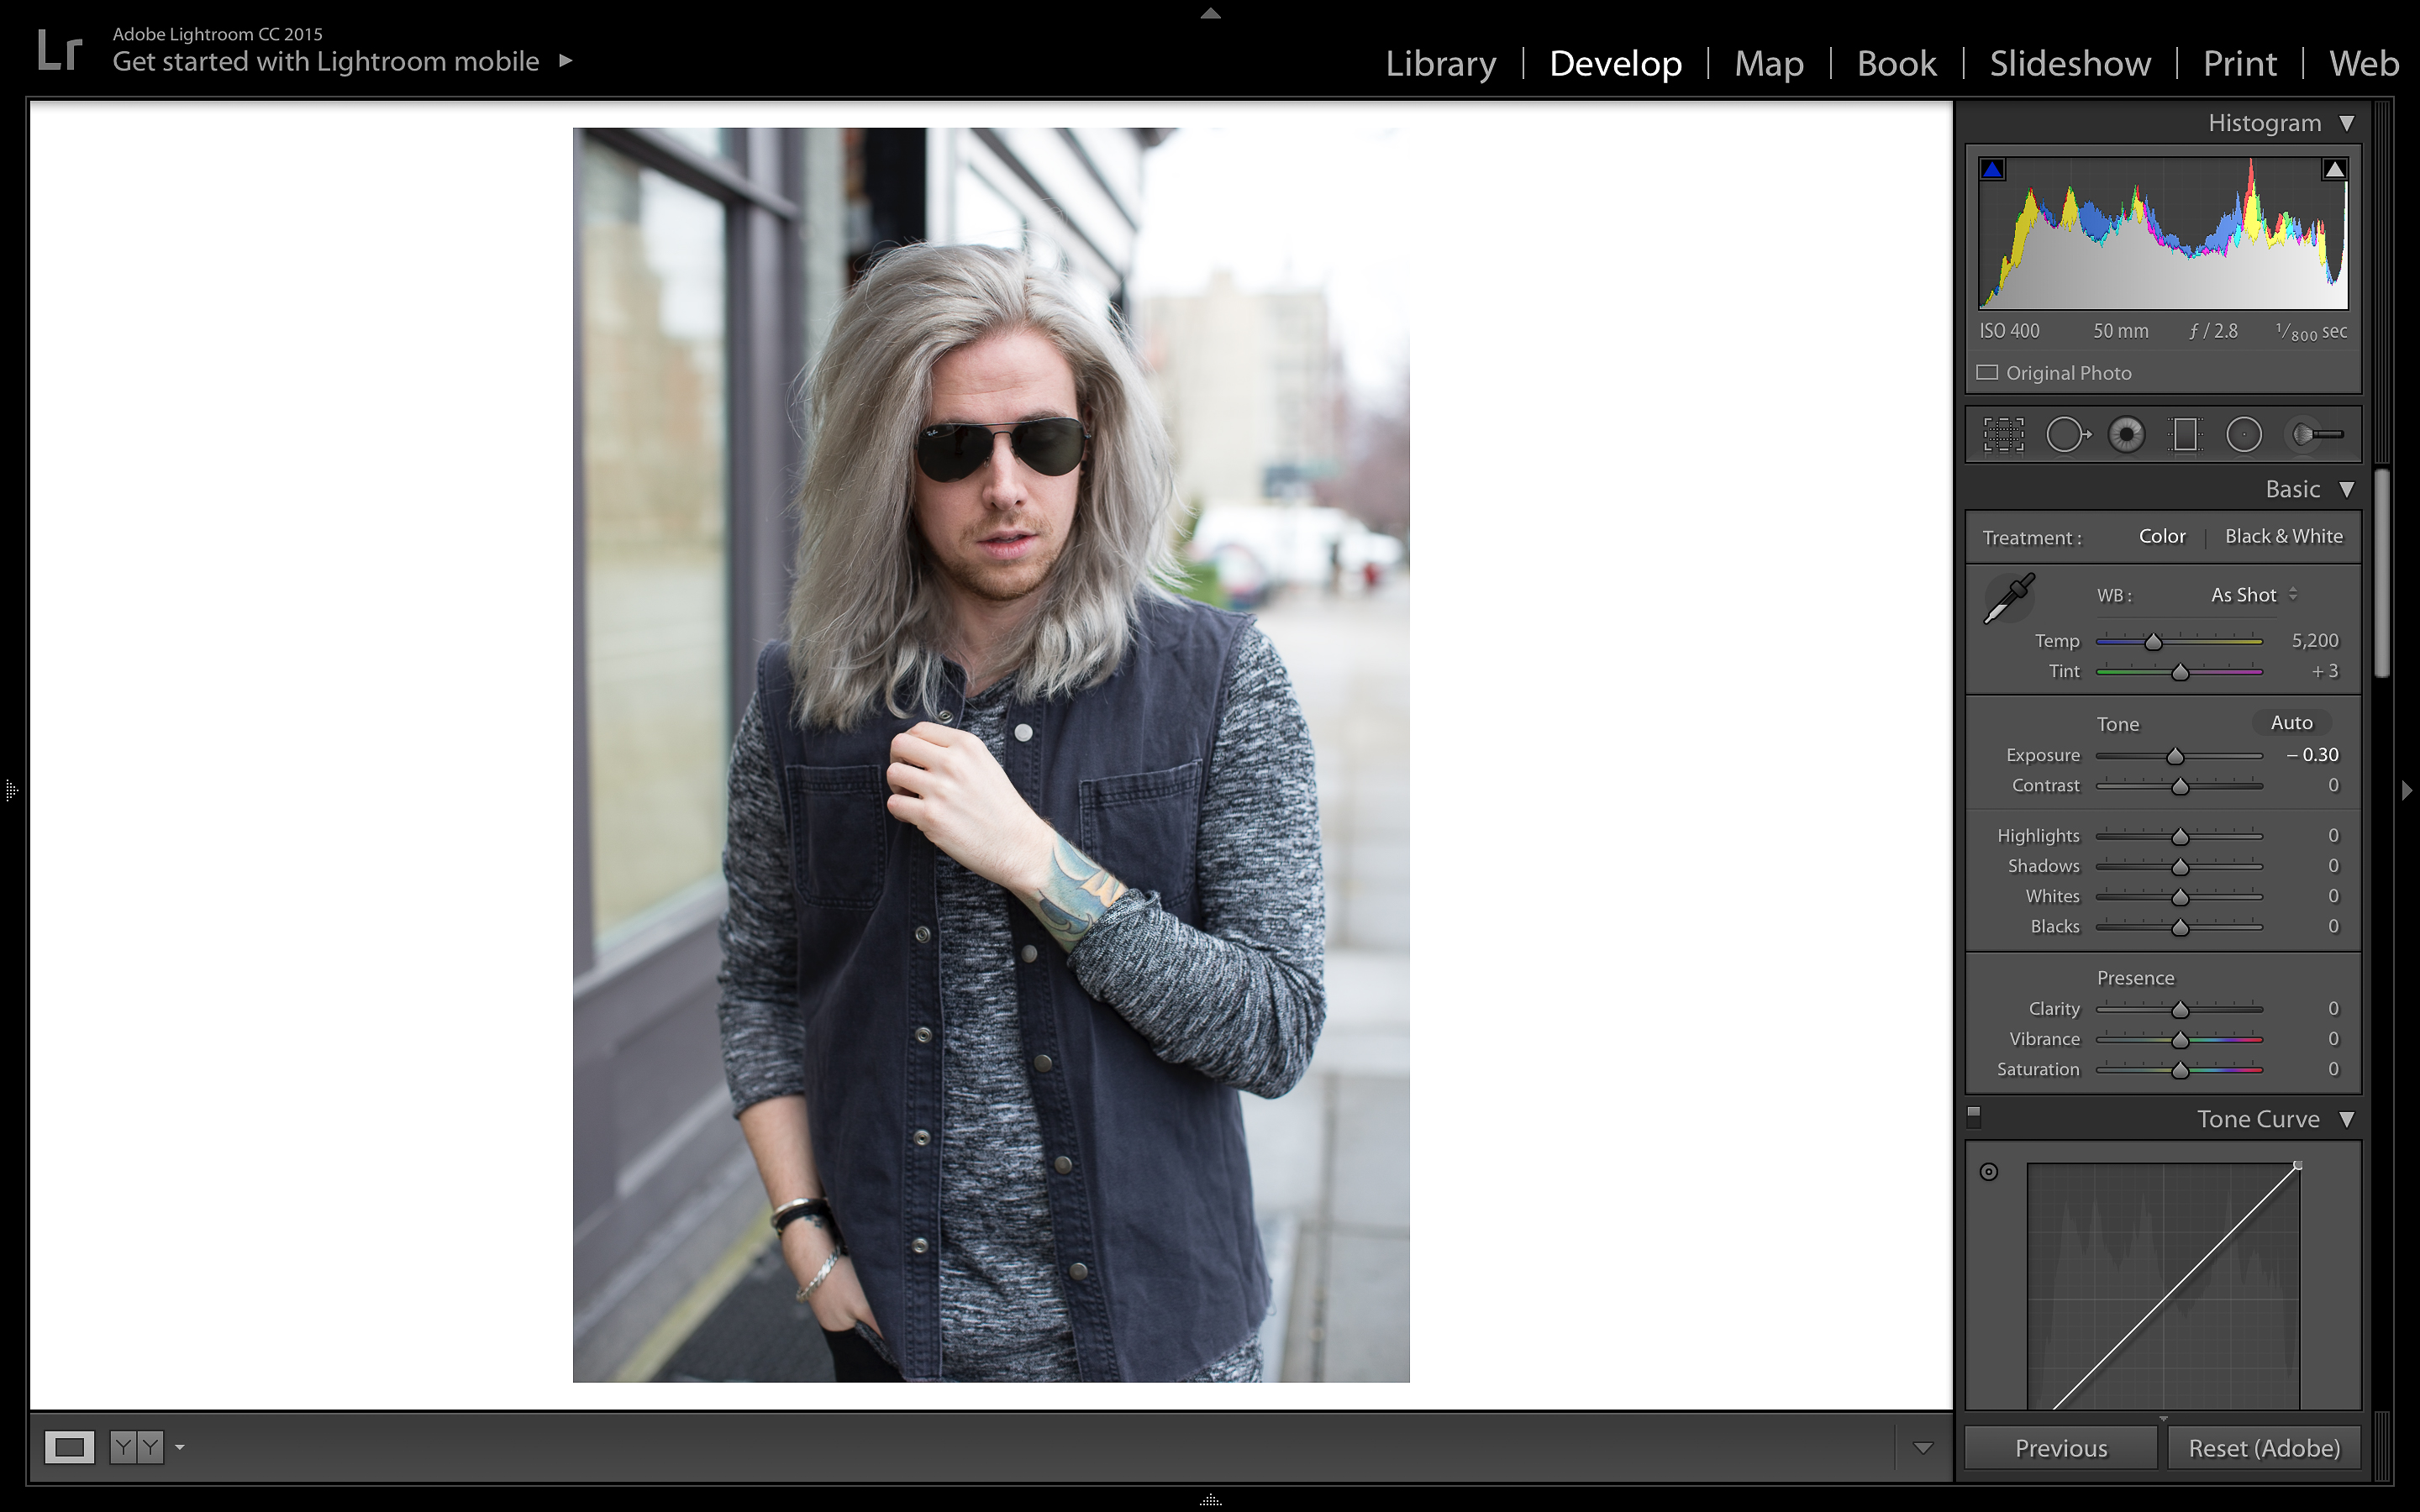
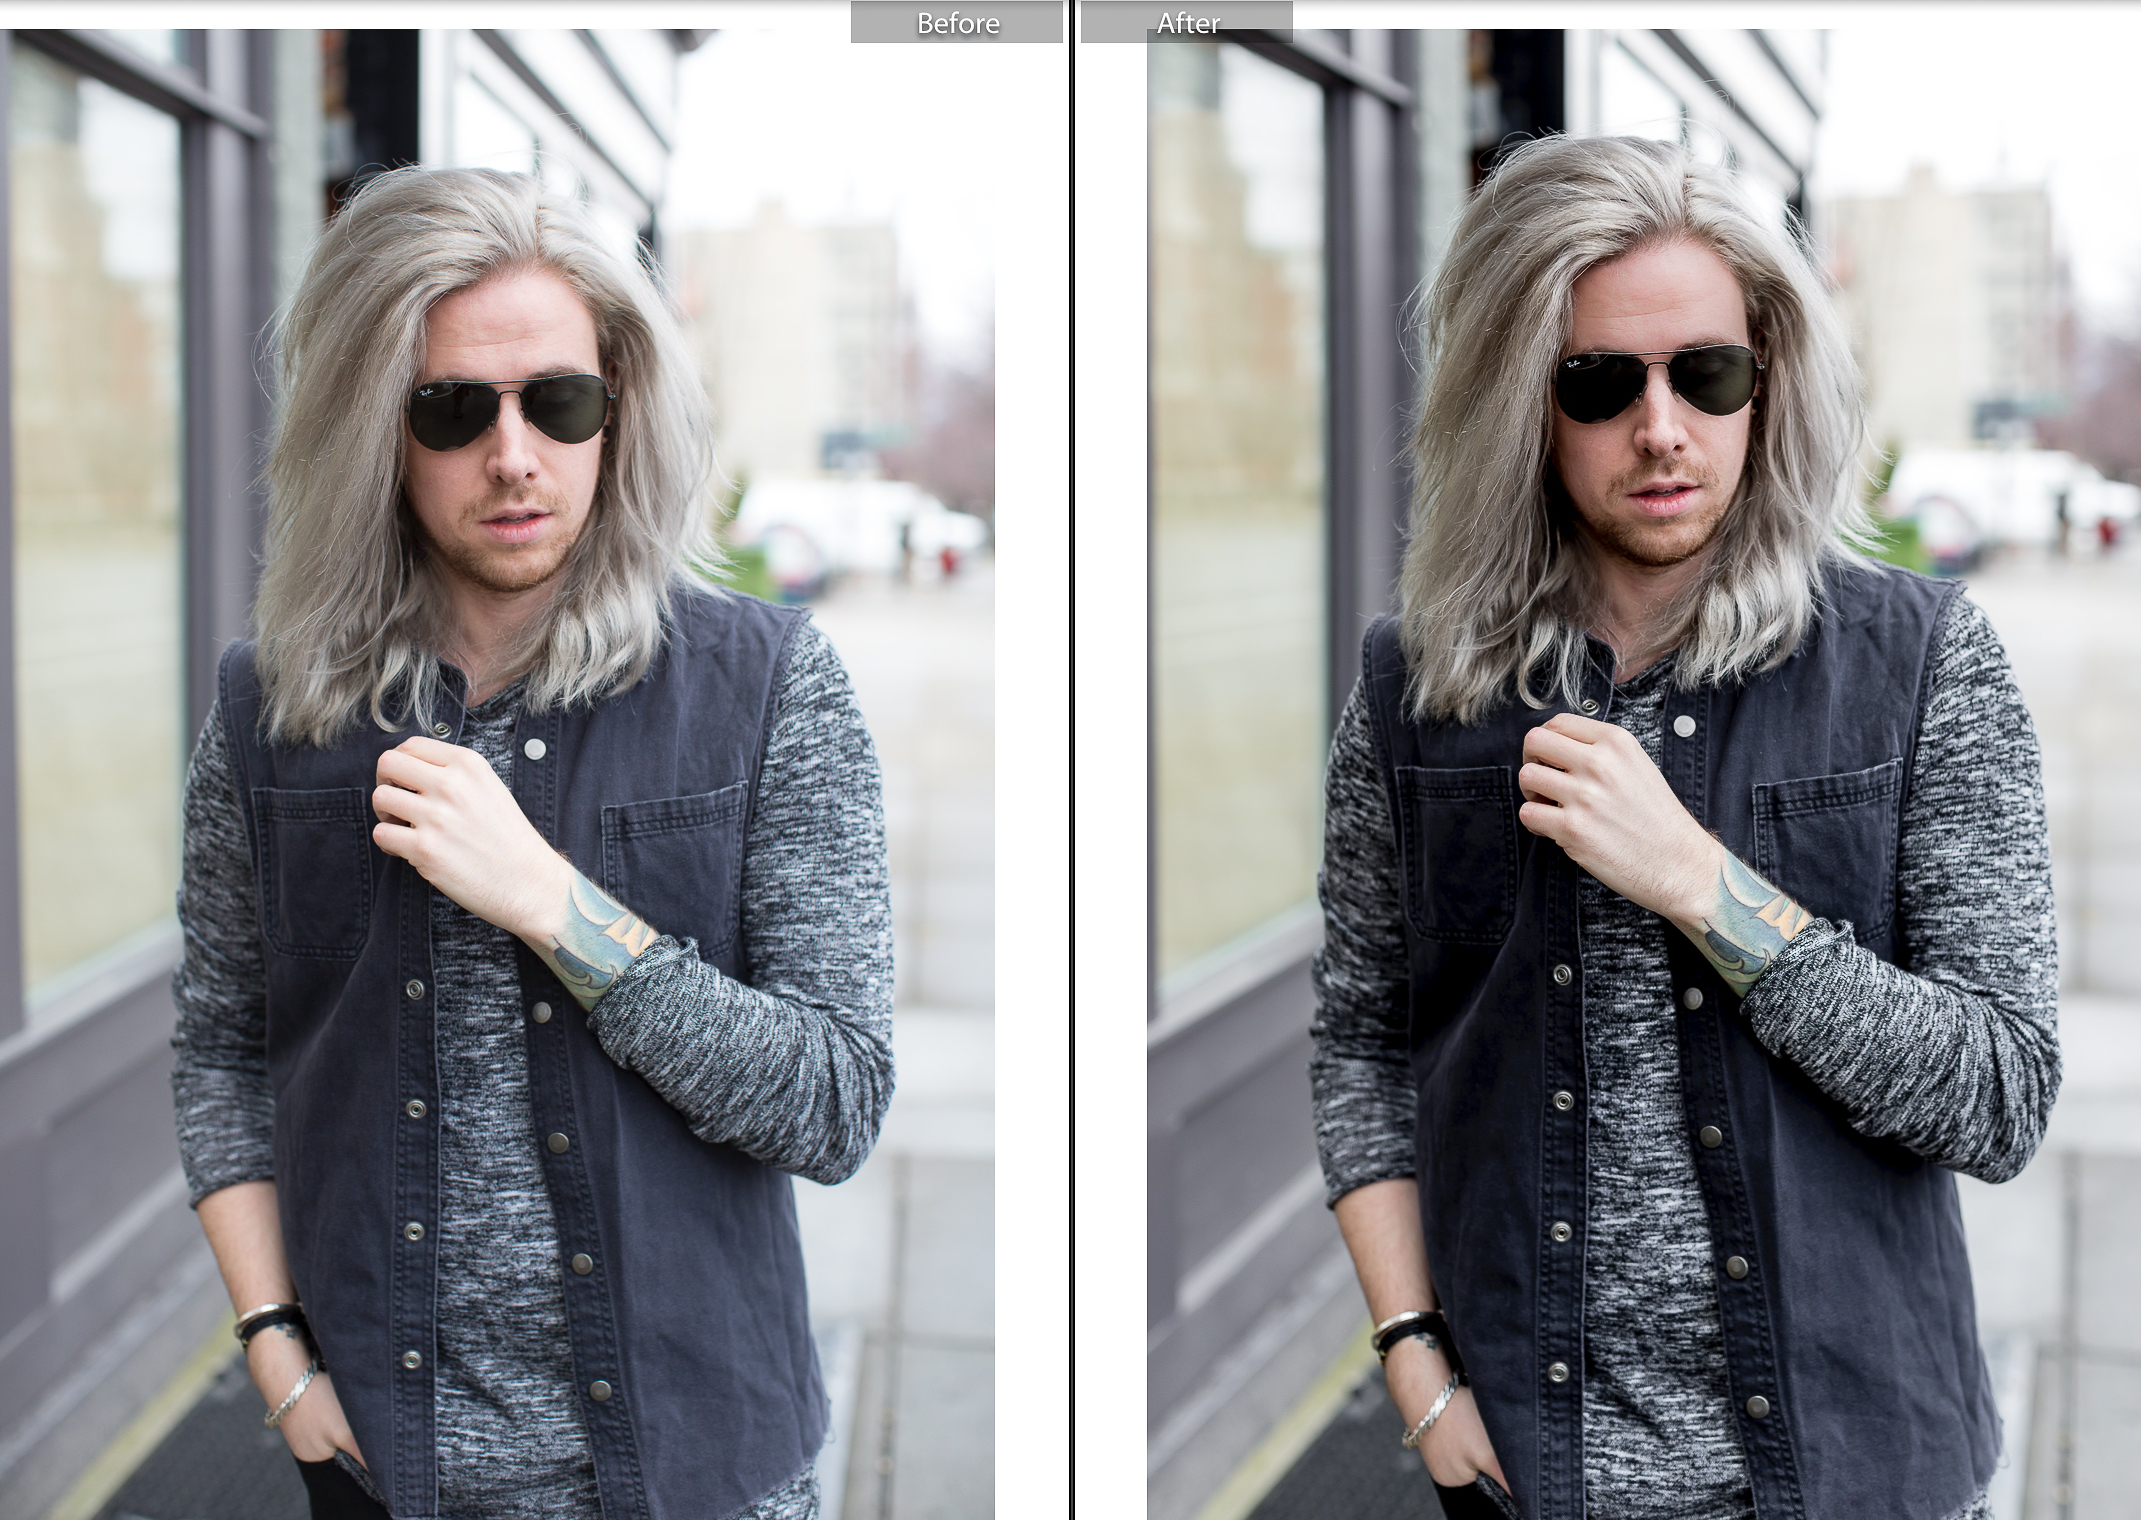
Exposure: This will vary for each and every photo and for each and every feed and/or blogger. If you’re unfamiliar with how this process works you drag the slider in the direction of desired effect. To the left for a darker photo and to the right for a brighter photo.
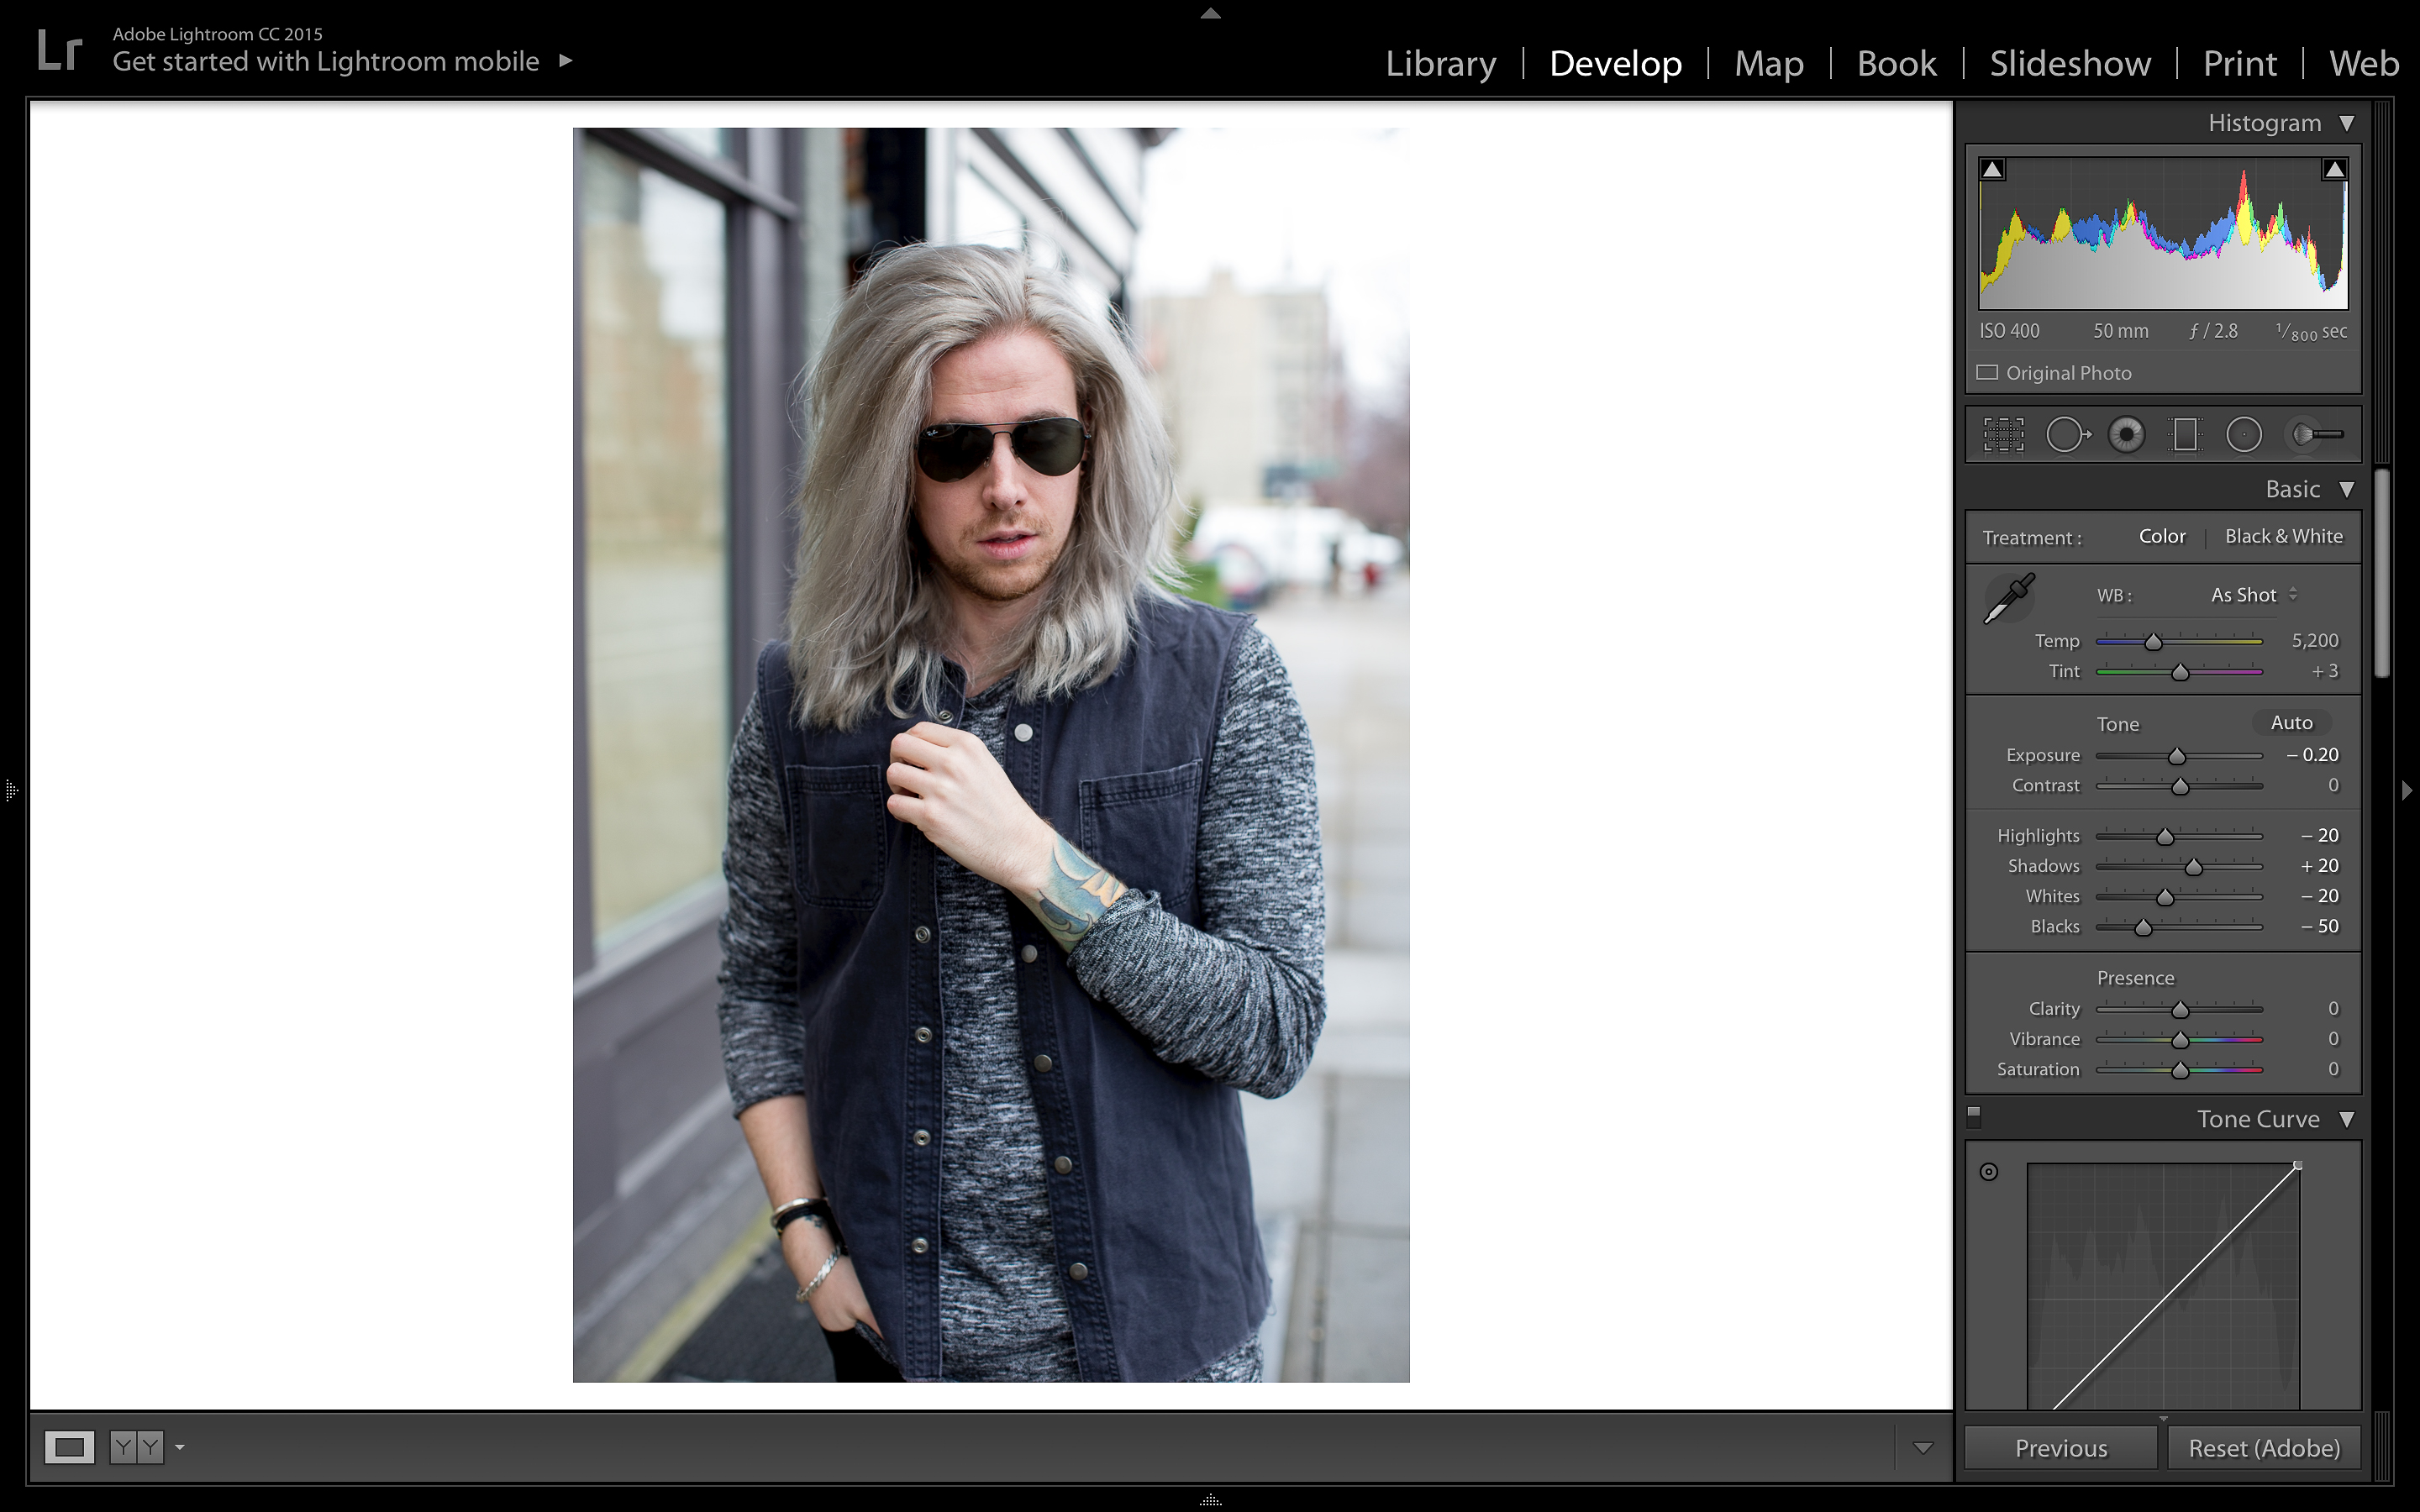
Now we’re ready to put in some work. Here’s where we’ll adjust the lighter and brighter portions of the photos as well as adding some much-needed contrast to the photo.
- Highlights: This slider adjusts the lightest parts of your photo. Think things like my light blonde hair or the blown own sky behind me. You would drag the slider to the left to help save some of those portions of the photo, and if the photo were too dark you’d slide the opposite direction.
- Shadows: Exact opposite of highlights and does just what it sounds like: adjusts the shadows in your photos. Can be used to create contrast or to brighten up dark areas in photos.
- Whites: Similar to highlights, but this is where you really begin to work on contrast in your photo. High contrast photos have white, whites and black, blacks. Simple enough, right? I tend to not adjust this often, unless there’s a blown out sky behind me or my hair happens to disappear.
- Blacks: As you can see from the above sliders I tend to drag this pretty far to the left. I do this in lieu of adding contrast with the contrast slider because the contrast slider has a weird affect on skin tone and can easily be over done. This slider on the other hand just makes blacks, black – increasing the overall contrast in your photo.
- Clarity: Only adjusts the midtones in photos, meaning it doesn’t touch the highlights or shadows, but everything in between. Less is definitely more when it comes to this slider, trust me. Slide to the left for softer midtones, and to the right for more contrast in your midtones.
- Vibrance/Saturation: I don’t like overly saturated photos so this is a slider I very seldom touch (unless it’s a food photo), but if you’re a fan of bright colors then I’d bump these guys up a few notches.

HSL: Now that we’ve adjusted the bulk of our photo it’s time for some fine tuning. In this panel we’re able to adjust the hue, saturation, and luminance (brightness) of certain colors in our photos.
- Hue: Not a tool that I use that often, but it can be handy to adjust a color that may not have photographed the way you would have liked it.
- Saturation: I almost always drop the orange and red saturation a few notches because my cheeks tend to photograph a little warmer that I like. Also in this photo I drug the blue saturation to the left because my vest photographed blue, when it’s actually grey.
- Luminance: I also drop the orange and red sliders here to darken my skin without bothering the brightness of any other areas of the photo. When shooting outside your face and hands (especially when you’re pale and wearing dark colors) can shoot a lot lighter than you’d prefer – drag the skin tone (orange and red) sliders to the left (slightly) to darken those areas a smidgen.
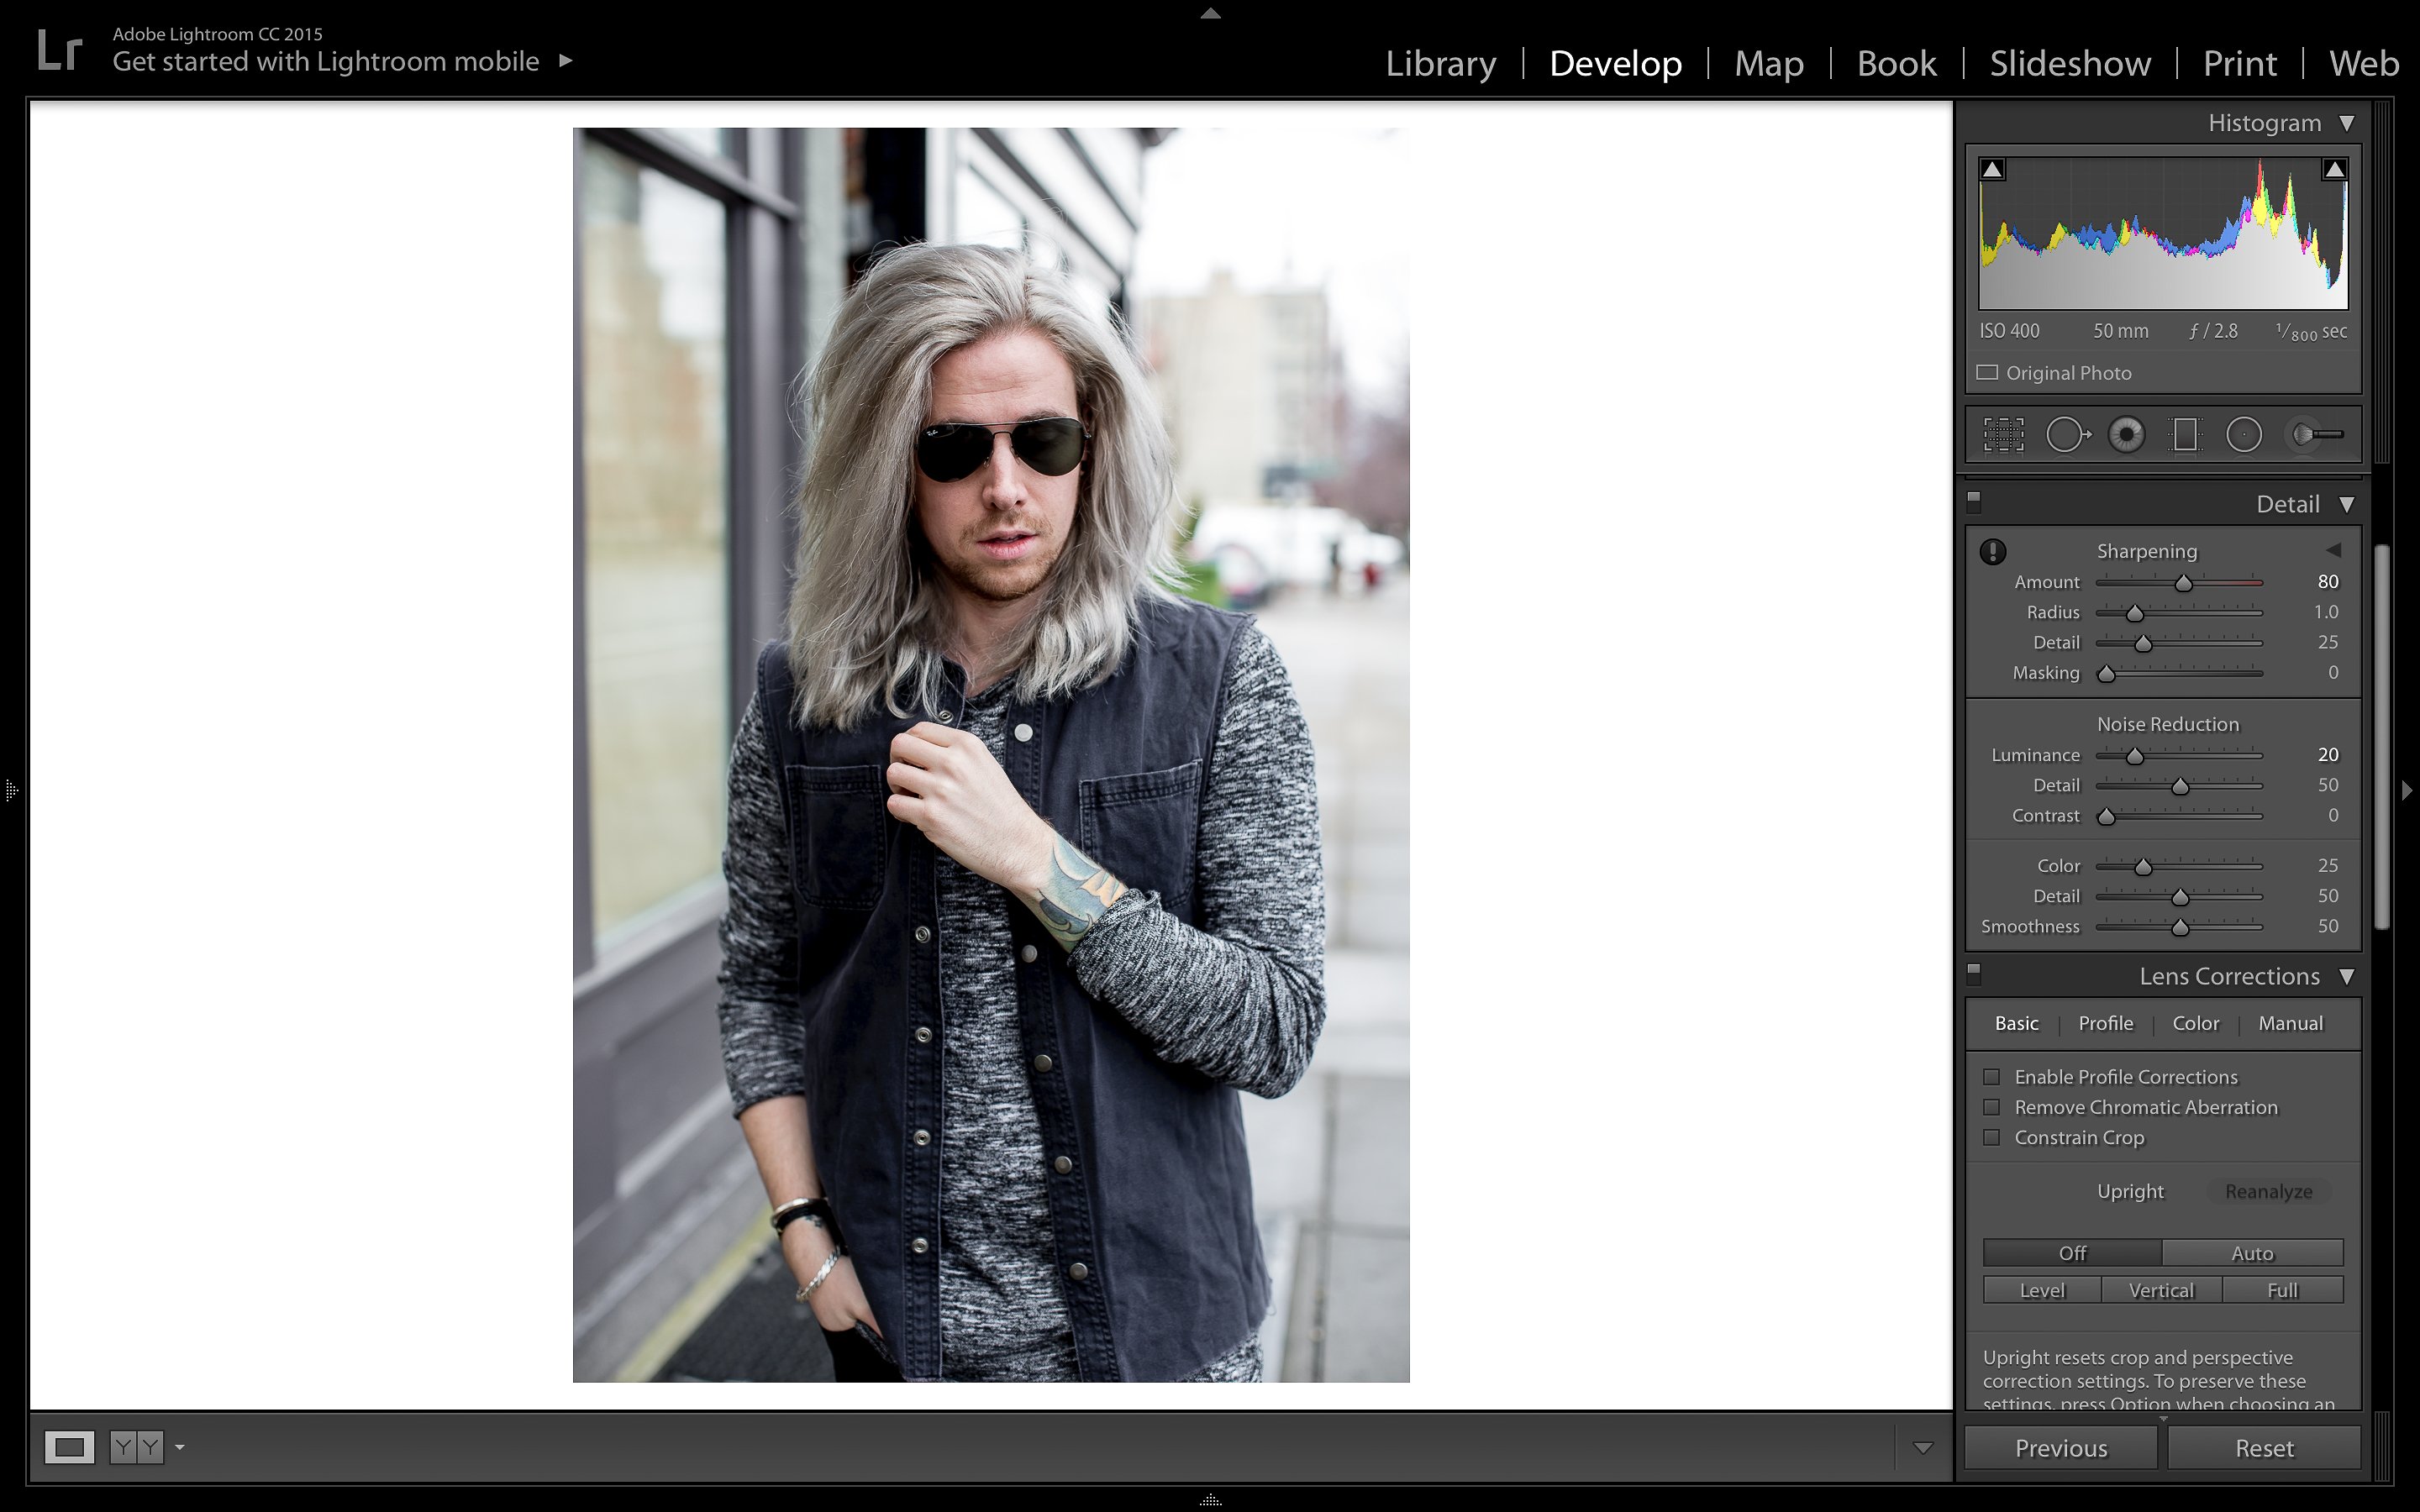
Detail: We’re almost done, yay! Now all we have left to do is the fine tuning. I always enter a value between 70 and 90 on sharpening and between 20 and 30 on luminance. Sharpening makes for sharper images, but in the process can cause pixels to show in areas of the photo that aren’t as in focus – the luminance slider helps smooth those out.
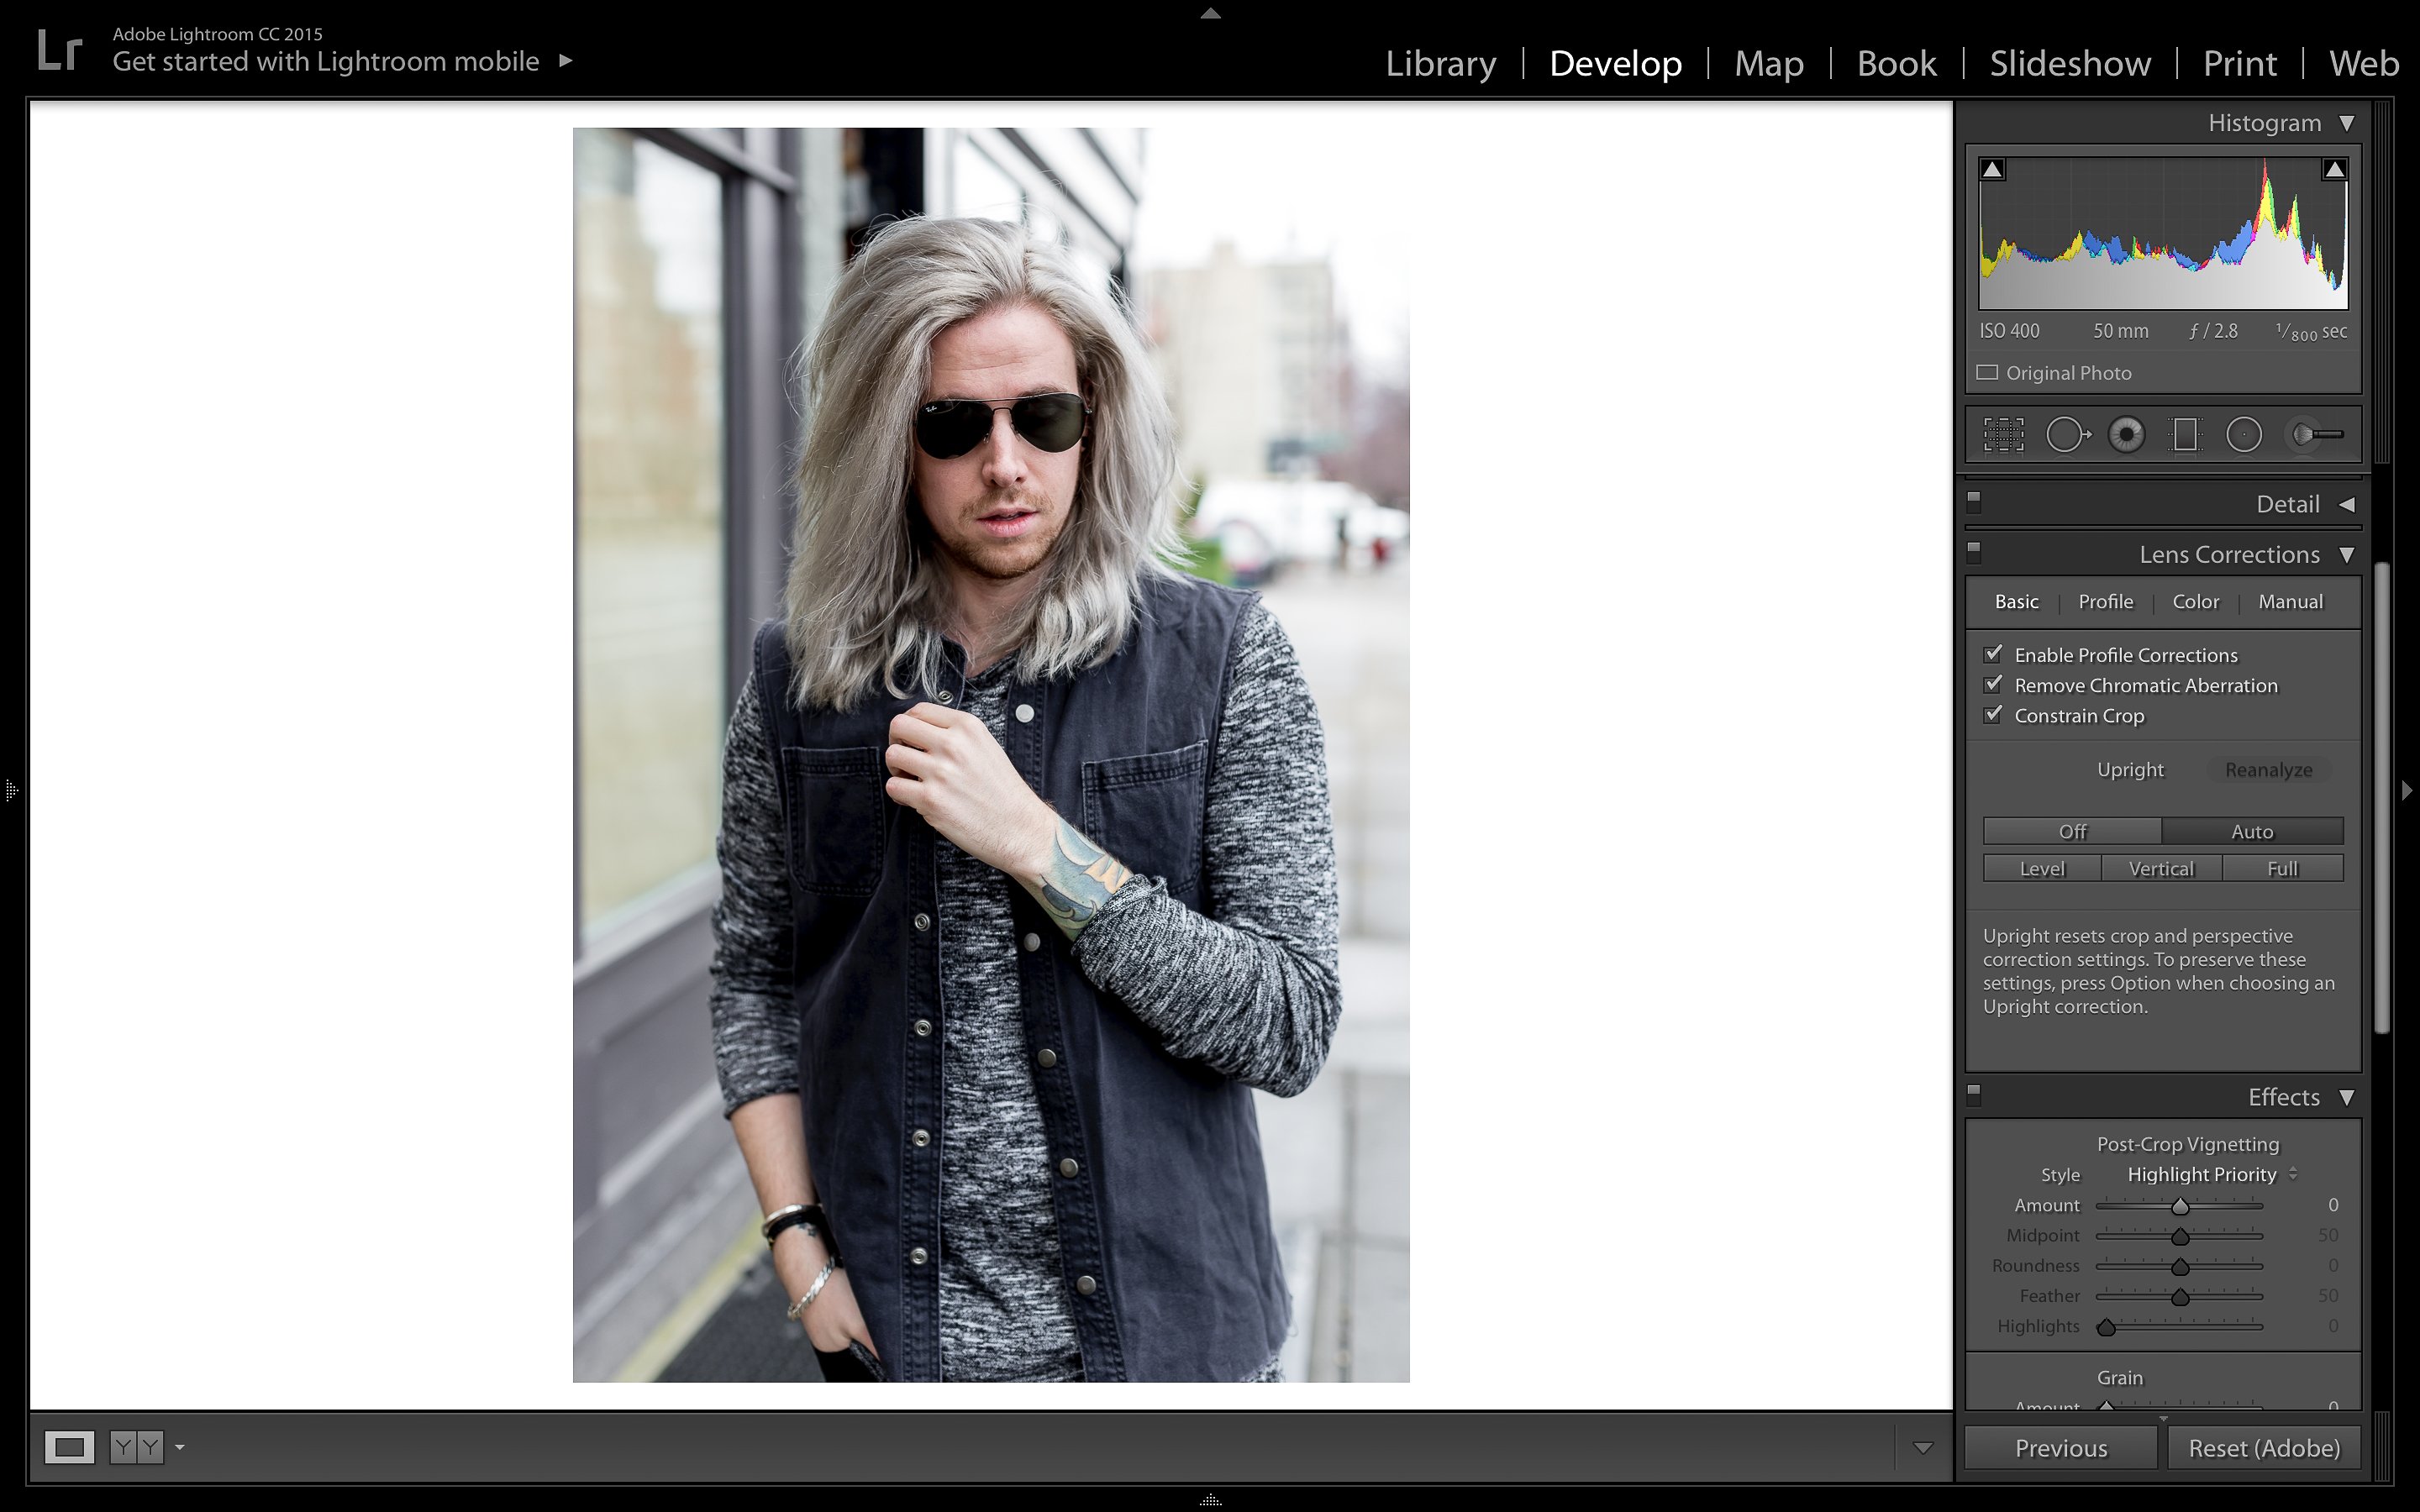

Lens Corrections: Simple and does what it says: it corrects any distortions that may have been caused by your lens. Check the three boxes, hit auto, and Lightroom will adjust to the best of its ability. But remember – it is a computer program, it’s not always perfect so feel free to tweak it.
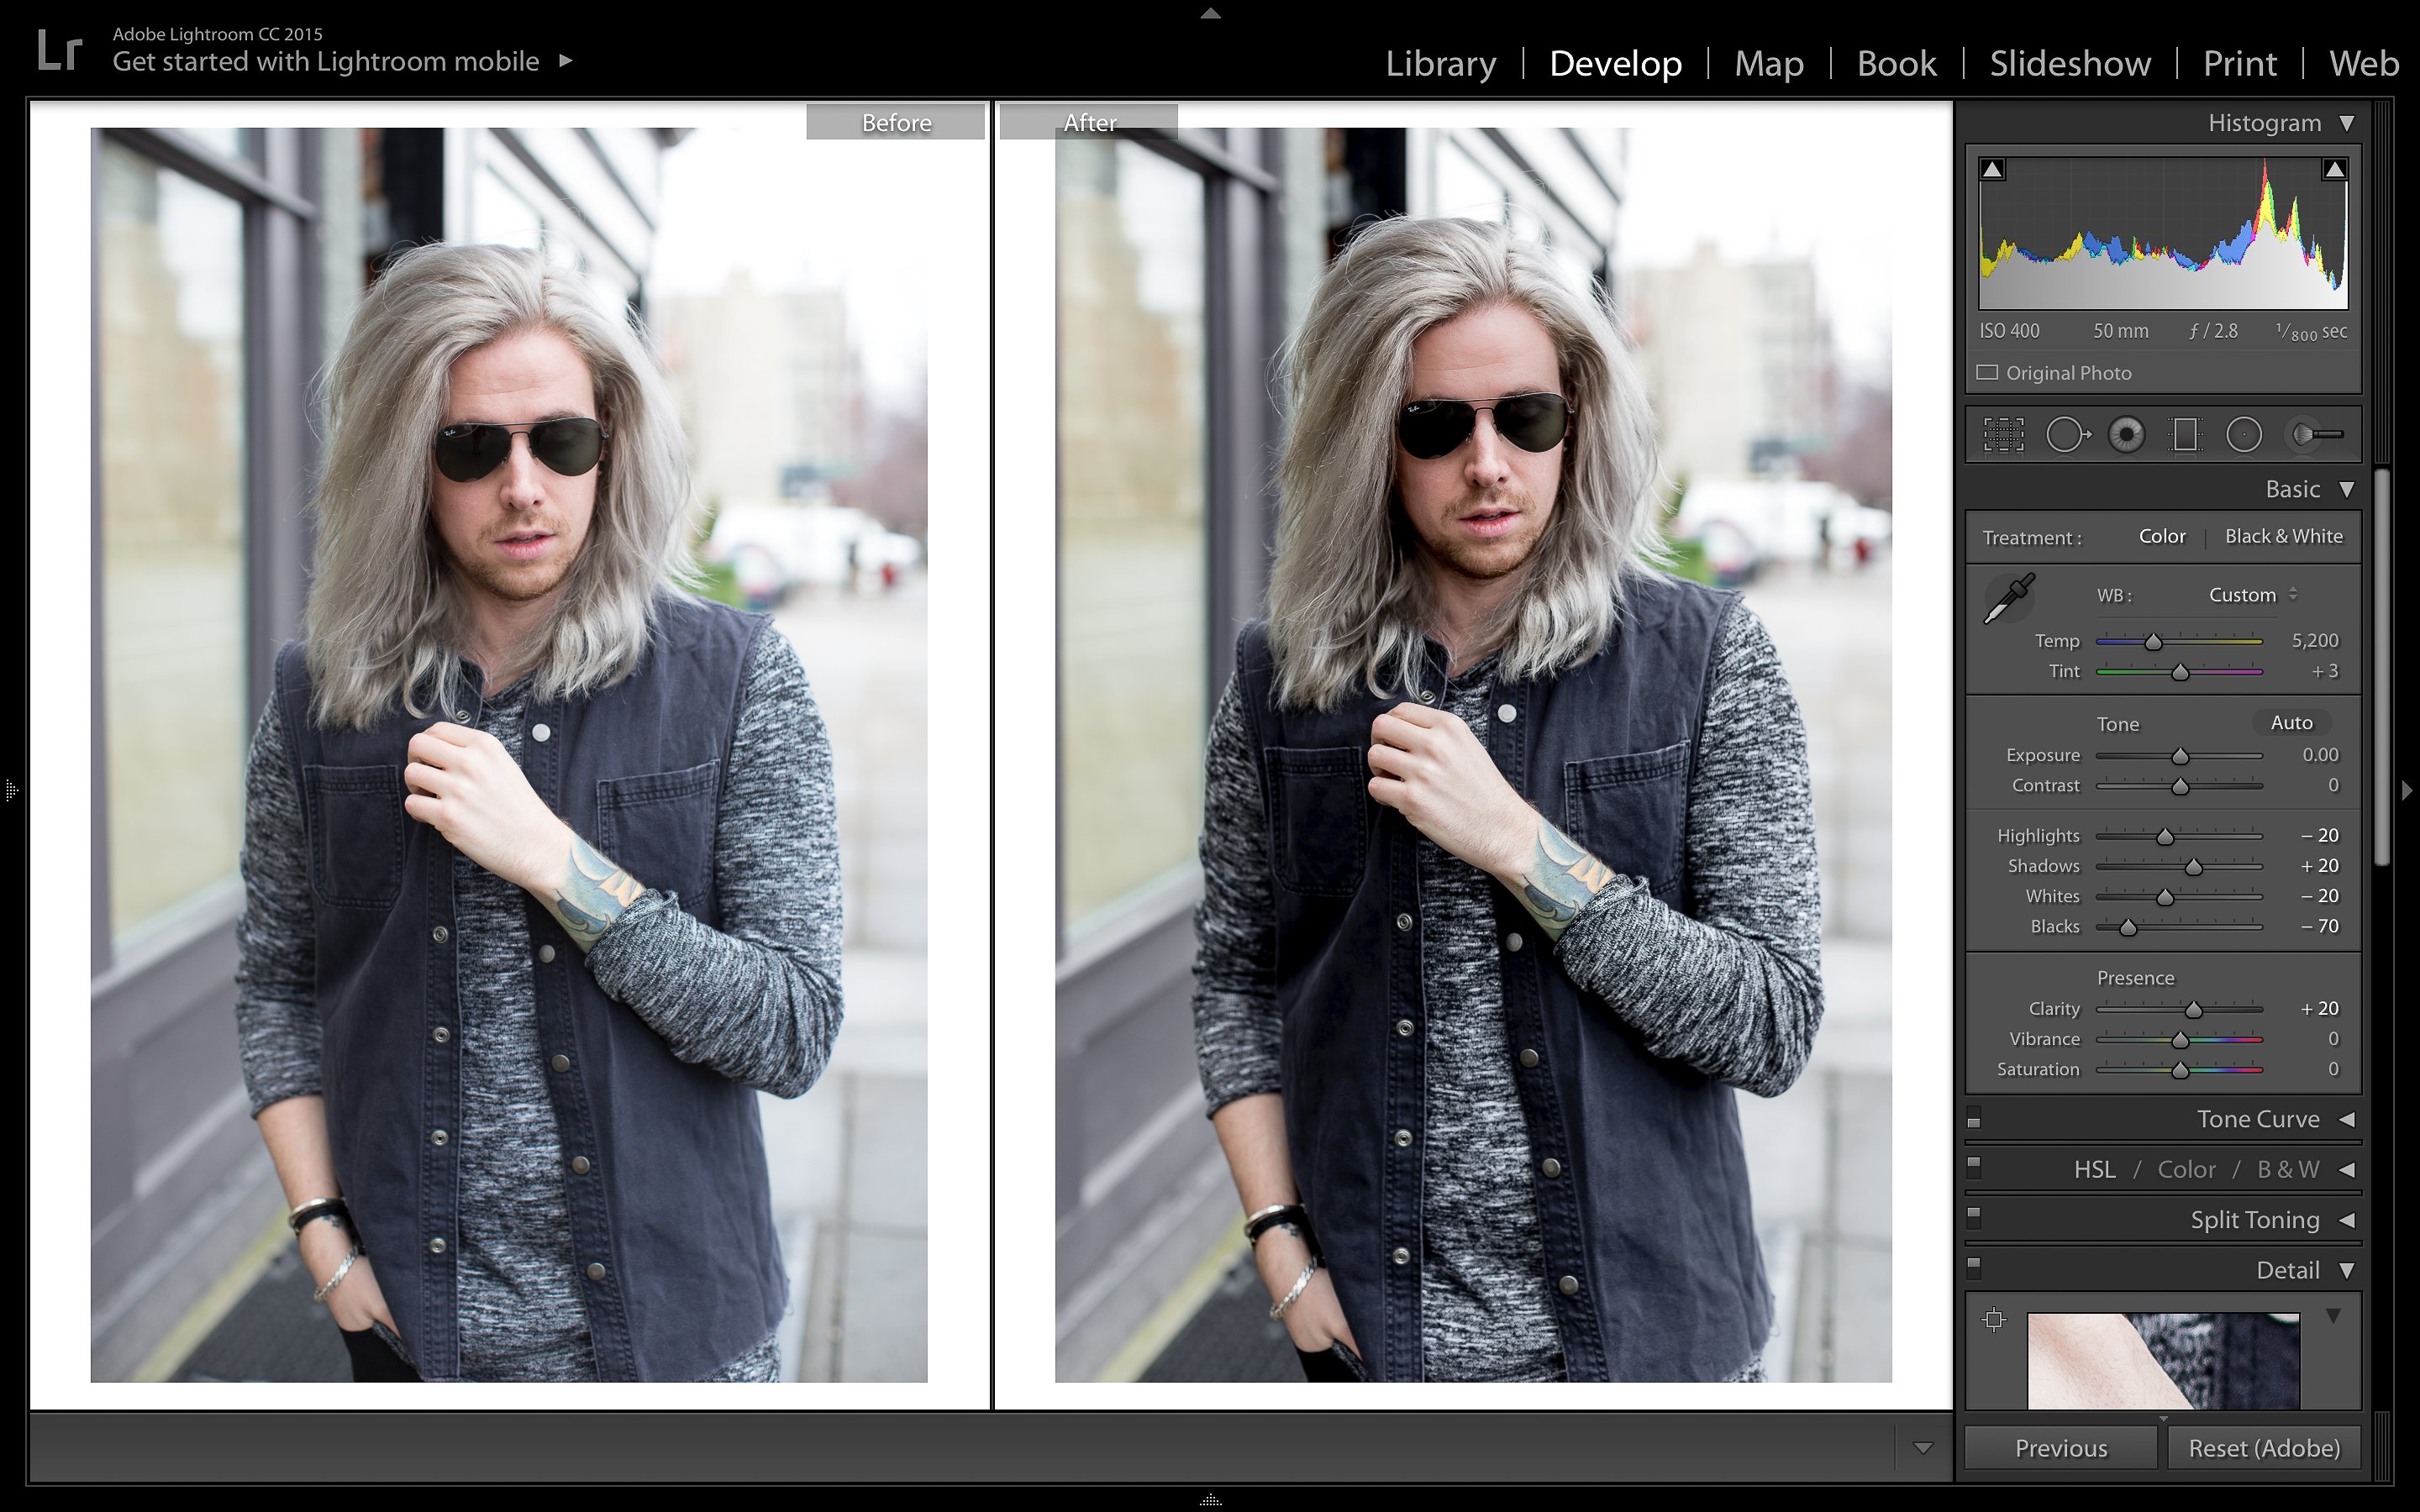
And just like that, we’re done! May seem like a lot of steps right off the bat, but I promise once you get the hang of it (and stop beating yourself up for everything under the sun) it’s a breeze.
Now this is in no way shape or form a complete guide on how to edit outfit photos in Lightroom, but I did my best to cover all the bases. If you have any questions that I didn’t cover feel free to leave me a comment below, and I’ll do my best to answer them!
BONUSES: Gonna throw in a few bonus things that I’ve learned over the years as well before I sign off. Like how to create VSCO like effects in Lightroom and how to properly export photos.
- Film Emulation: If you go to your Tone Curve Panel you can recreate film like qualities in your digital photos. Add three points on your tone curve like the above image shows, and drag the the lowest point on the line (blacks) up like shown. This will “crush” the blacks giving your images a film like feel.
- Export: When you export your photos name your photos with what you’re wearing, keywords you’re hoping to include in post, and other things that your readers may search for you by. Don’t spam your image titles, but definitely take advantage of this SEO friendly method.
- Resize: While we’re chatting about exporting you’re going to want to resize your photos as you export. Find the width of your photos in your feed, times that by two, and enter that into the dimensions slot on your export screen.
Looking for other photo related tips? Then you’re in luck. I shared my tips on How to Take Your Own Outfit Photos awhile back, and it’s still one of my most well read posts. Also, it goes to show that practice does make perfect. Compare my editing in that post to today’s, and let me know what you think.